
JEWELRY MANUFACTURING PROCESS
Our Jewelry Manufacturing Process
Hong Factory Co.,Ltd. proudly continues the lapidary’s jewelry manufacturing legacy. The handmade designs combine unique and sophisticated production process and crafting tradition inherent in JEWELRY MANUFACTURING PROCESS with a desire to constantly innovate and evolve. Our passion and enthusiasm results in high quality, expertly crafted pieces of classic yet contemporary jewellery using only the finest quality multicolor gemstones in oxidized silver setting polished to enhance gleaming antique silver that is well suited to all occasions. Paired with lustrous Swiss Marcasite, the iridescent gemstone adds a sparking, luxurious finish to each piece.
If you would like to see the jewelry making process in person, you can visit our production facilities in the heart of Bangkok city, Thailand. There you can watch our artists creating works of art in person, while viewing their finished works in our adjoining showroom. The master jewelers on our team have decades of years of jewelry making experience. Hong Factory team has created exquisite Marcasite jewelry that have been exhibited in international jewelry fair and editorialized in top magazine. More importantly, they have made jewelry for thousands of satisfied customers – just like you.
Assaying Your Jewelry
We combine high ethical standards to optimal accuracy in the acquisition and processing of precious metals. All of Hong Factory’s silver metal can be traced to accredited sources. Our silver jewelry will be regularly tested by trained personnel in a reputable lab. The best means of testing is called assay, which is a destructive test that melts down 0.5 grams of metal or more so the alloyed elements and ratios can be accurately determined and this test is extremely accurate. We can provide you with the exact chemical composition breakdown for all materials present in our jewelry.

JEWELRY MANUFACTURING STEP 1 : JEWELRY DESIGN

Each piece of jewelry starts off with an inspiration. There are a few motives that can inspire a jewelry designer. Primary incentives to design jewelry include focusing on the intended user desires and needs. Another is to ride the wave of current market and fashion trends by elaborating current popular themes. Still another more free spirited approach is from the soul whereby artisans own dreams and the materials and gems dictate the direction of design.
From the purist’s view of jewelry designing, could let our imagination go in any direction we wished and create free-spirited themes as they come to mind. In actuality, consideration has to be placed on a wide variety of concerns, ranging from the user desire, jewelry manufacturing boundary, the design element, the characteristic of gemstones, jewelry styling to the cost of materials.
The designing process must require functional knowledge of metallurgy and design elements to achieve several goals simultaneously. The setting must hold the gems securely in place, showcase your dazzling gemstone and the metal object, it must stand up to wear while protecting the stone, and it should harmonize with the aesthetics of the piece. Accent gemstones can be incorporated into the jewelry to add a touch of sparkle and glamour. The ring shank portion can affect both the appearance of the ring and how it feels to the wearer. Precious metal details i.e. milgrain and filigree are a great way to add interest or embellishment to your jewelry. Finishing details can affect the overall appearance of the jewelry, giving it either a more contemporary or vintage look.
Once a theme, value, and target user are established, the artist can work within reasonable boundaries and unleash the talents and passion they possess. With a given theme and reasonable parameters on materials, it is possible to confidently design jewelry and reflect the mood or emotion desired. The pleasure and challenge of including each element in a jewelry pieces is to resolve the various factors that come into play.
For our designing team, this is done with a detailed color painting, or creating a simple basic sketch to use as a guideline. Our CAD Designer will also create a comprehensive, computer rendering through CAD jewelry design, where we are able to view the jewelry from every angle and can rest assured that the designs will look exactly how we envisioned.

The process of designing jewelry has relied on hand drawn sketches and hand carved wax models for years. While these methods are still used by some designers, 3D printers, CAM (computer aided manufacturing), and CAD (computer aided design) programs can greatly simplify the design process and reduce the time it takes to produce these prototypes. CAD programs allow designers to create new and unique designs much more easily than with traditional pencil and paper. With pre-made settings specifically for jewelry makers, there is an increase in efficiency as previously prepared standardized parts of a design can be re-used or modified. Some of these premade settings can include commonly used elements i.e. autocreate basic ring shapes, gemstone settings, scrollwork, filigree, and vines, etc.
Our jewelry model can come into life with the use of two computer-aided manufacturing (CAM) methods: CNC mills and 3D printers. CNC milling machines carve a jewelry model from a block of wax and use sharp rotating tools or cutters to remove all parts that are not needed. Milling is a subtractive method in contrast to additive manufacturing as in 3D printing. For the 3D printing process, a wax-like resin is used as printing material. It prints layer upon layer of wax to create a piece and also prints the attached supports and wax sprues. After they’ve been printed, models can be used in the lost wax casting process traditionally preferred by jewelry manufacturing team. With such swift model printing, mass producing a design is much easier.
With CAD jewelry design, the cost of manufacture can be evaluated to meet customer’s budget without any actual production required. If the price point is too high as a consequence, we can make any adjustments to the dimensions, materials or both until the target is met. Consequently we can do a better decision making before carving the jewelry model. This could be barely achieved with the traditional handcraft technique.
JEWELRY MANUFACTURING STEP 2 : WAX CARVING
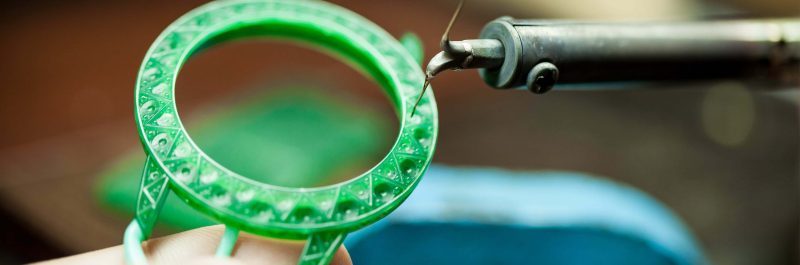
After the design is finalized, the next jewelry manufacturing process is to create wax model with all the fine details by a computer-aided wax-making machine. The computer file of the 3D model is transferred to a milling machine to cut out a wax model or a 3D printer will grow an exact replica of the jewelry. The end result of wax model can be mathematically precise and offer mechanical feel to it.
the hand carved is absolutely essential to present a more organic design which showcase vibrant curves of natural forms and softer sensibility of the jewelry. In the molding department, the experienced molders will incorporate the traditional technique to hand carve all the dimensional and intricate details to turn the rough wax mold into fine carved wax mold in which the advance technology cannot replicate.
JEWELRY MANUFACTURING STEP 3 : SILVER MASTER MOLD
The fine carved wax is then imbedded in a metal cylinder which will be filled with plaster-like investment and left to harden. The mold containing the hardened plaster is heated in an oven at extreme temperatures to burn away any wax traces, leaving a hollow impression of a jewelry shaped in the hardened investment. That space is filled with silver, forming a duplicate of the original wax design, or called the silver master model.
To reach the ultimate beauty of a fine piece, the details and expression created in a carving are to be continued in the silver master model which sets the base for the total process there from. Our model makers are highly skilled metal-smiths that can create milgrain and other delicate vintage elements on the silver master model which give the uniqueness and distinct in marcasite jewelry.
The tricky thing is that during the jewelry manufacturing process of turning this model into a final piece, the scale will shrink slightly, depending on the materials used. So the model maker needs to make sure that the original wax model is slightly larger than desired: but just the right amount so that the setting and the ring, for example, will be the right size after shrinking for the stone and the finger it’s being made to fit.
JEWELRY MANUFACTURING STEP 4 : THE RUBBER MOLD
The silver master model is then packed into a fat sandwich of special mold rubber and squeezed tight under high heat and pressure until it forms a solid block. The rubber forms itself around the master model, creating a perfect three-dimensional impression of the piece of jewelry. The rubber is cut in half to remove the silver master. Then the rubber is put back together and the final result is the rubber mold which can be accurately duplicated for thousands of wax replicas for mass production.
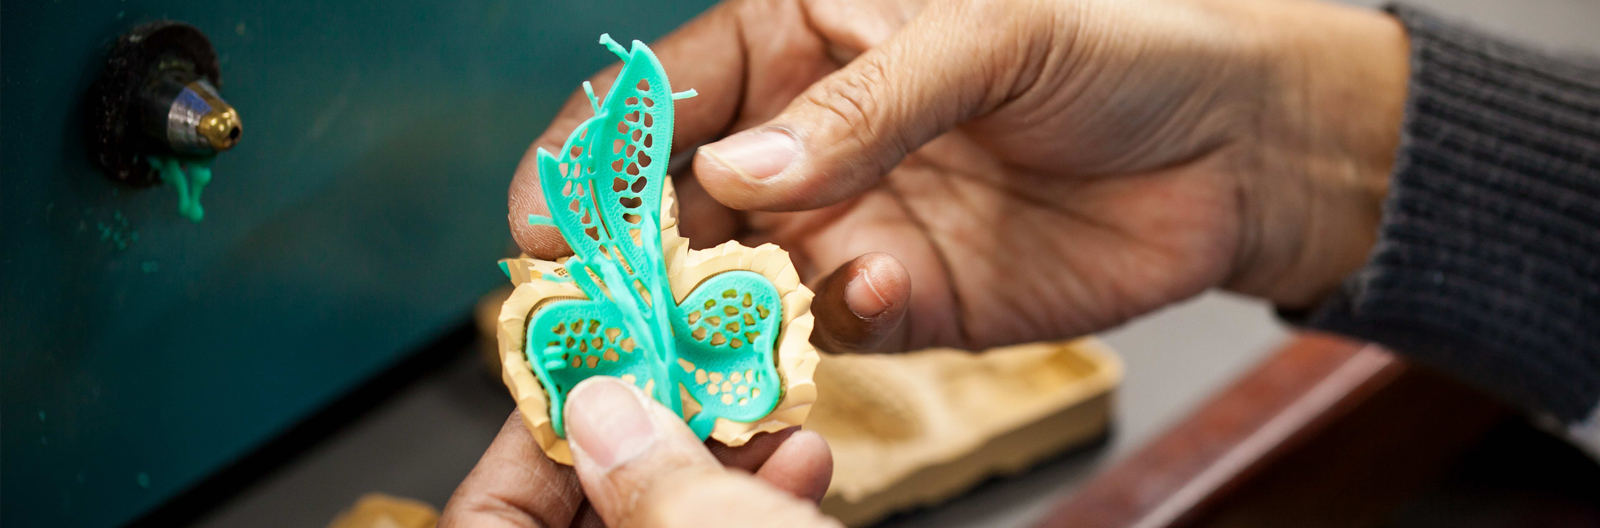
JEWELRY MANUFACTURING STEP 5 : TREE WAX

Prior to injecting wax into the rubber mold, the rubber mold cavities must be cleaned with an air gun or soft bristled brush. The wax injector must use a mold release product, such as talcum powder to make an air way opening. The use of powder is absolutely necessary because it enables the parts of the rubber mold to remain separate, and thus ensures the complete escape of all air and allows the injected wax to completely fill all crevices of the rubber mold. Following these cleaning and maintenance steps will guarantee easy removal of the wax from rubber molds.
Now hot wax can be injected through a hole in the rubber to fill the jewelry-shaped space inside, forming a wax reproduction of the master model. With the use of our vacuum wax injectors we are able to duplicate excellent results. After the wax hardens, it can be removed and inspected for quality, and will reveal any flaws in the rubber mold. Every wax model must be inspected with a 10x loop. Once a wax has passed through the quality control team, it is time to attach the wax to a small wax tree.
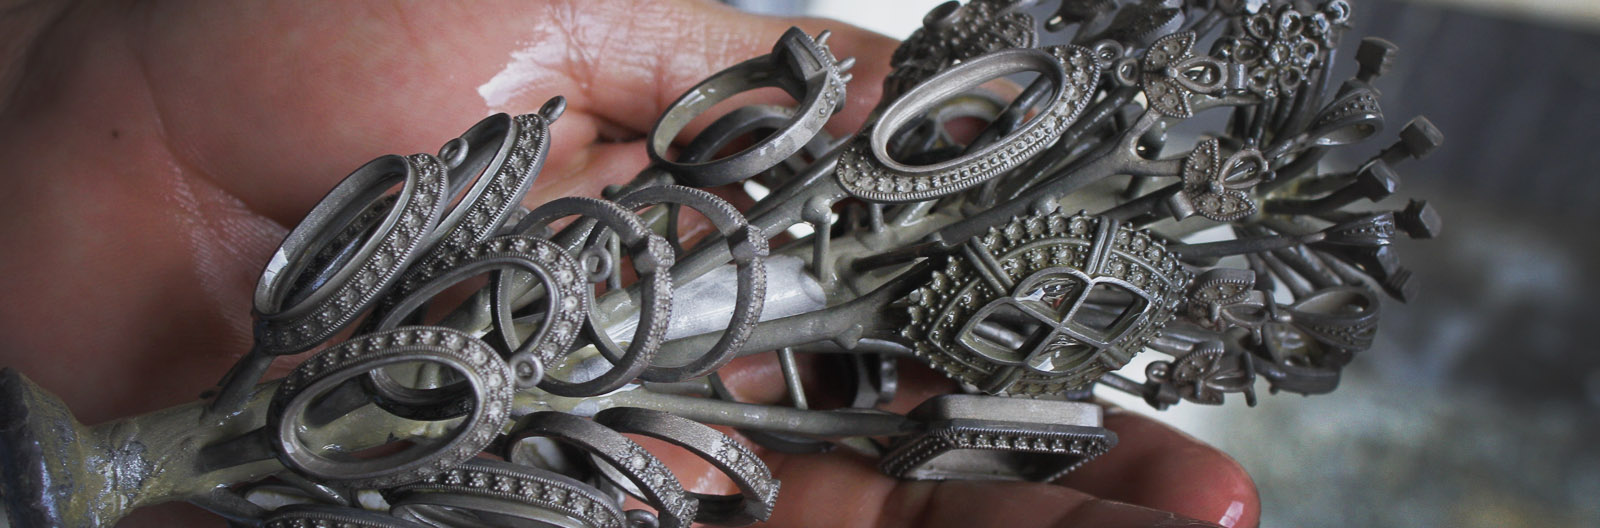
The technicians must evaluate many parameters before setting up on a tree including the right position and the right size of the sprue, the best angle to attach the wax to the tree, the temperature to cast these jewelry pieces and so on. Multiple wax models can be attached to form what is called a wax tree and placed in a cylinder mold. Creating a tree allows the jeweler to cast multiple jewelry pieces at once. The wax models are attached to a sprue, which is a thick straight cylinder wax rod and will eventually form a channel for the molten metal to enter the mold. Once the tree is finished and all the wax jewelry models are attached, it is now ready for the process of ‘lost wax casting’.
The wax tree will be placed into a metal cylinder, known as a flask, so that a plaster substance, combining investment powder and water can be poured over to create the molds. The flask of wax models is then put into an extremely hot oven overnight so that the detail of the wax pieces is captured in the mold as the wax is absorbed. The quality of the wax is probably the most underrated part of the casting process. Any defects in the wax like distortion or internal air bubbles will dramatically affect the end results of your casting. Our mold cutters and wax injectors work very closely to insure that every mold is working perfectly to produce the finest wax possible.
JEWELRY MANUFACTURING STEP 6 : LOST WAX CASTING
After the wax tree is placed in the metal cylinder, known as a flask, a special liquid plaster called investment is mixed and poured over the tree to encase it all in plaster. The mold is placed in a vacuum chamber before it hardens to remove any air bubbles that could cause problems down the line. Once the plaster mold hardens and cures, the mold is then put into an extremely hot oven overnight so that the wax is burned out, leaving a branching tree hole in the plaster to be filled with molten metal.
After the mold is hardened and wax is burned out, grains of silver alloy and other metals added to it, are melted in a separate casting machine furnace. When the metal is the correct temperature, it is poured into the hardened plaster mold with the tree impression. Sometimes it is spun to make sure that the molten silver quickly fills the topmost branches of the tree, with every detail, before it starts to cool. Once the silver hardens, the mold will be put into a bucket of cold water to dissolve the plaster.
Now the silver tree can be reached and pull out jewelry models that are the exact replica as the initial wax pattern. The models are then cut free from the sprue and forwarded to jewelers who will execute jewelry polishing, jewelry fabrication, and stone setting to transform the casting into fine jewelry.
With the advent of high frequency melting and a host of other technologies, jewelry casting equipment is more dynamic than ever. This powerful induction heating generator provides fast and efficient melting and mixing of precious and non-precious metals and alloys. A heavy-duty DC motor delivers high speed and high acceleration centrifugal casting, resulting in excellent compacting of the metal and perfect filling of the finest details.
We have worked with our metal suppliers to come up with exact casting parameters for all of our silver works. You can be ensured that we have a specific digital program stored in our database to achieve perfect casting quality and repeatability. Still, the final piece is checked again to make sure that no errors were introduced during the casting process. In particular, quality controllers check for any signs of porosity in the casting: little grains, voids, or bubbles that indicate that the hot gold didn’t properly fill the mold, creating a strong single unit of metal. Porosity can be an indication of weakness in the metal’s crystalline structure.
First, the jewelry has to be removed from the branch, or sprue, that held it to the tree in the mold. It is then is tumbled into smoothness, sometimes sanded, lapped to make edges crisp, and then buffed by hand on a polishing wheel. Integrated Infrared temperature control ensures perfect casting quality and repeatability.
JEWELRY MANUFACTURING STEP 7 : ASSEMBLY
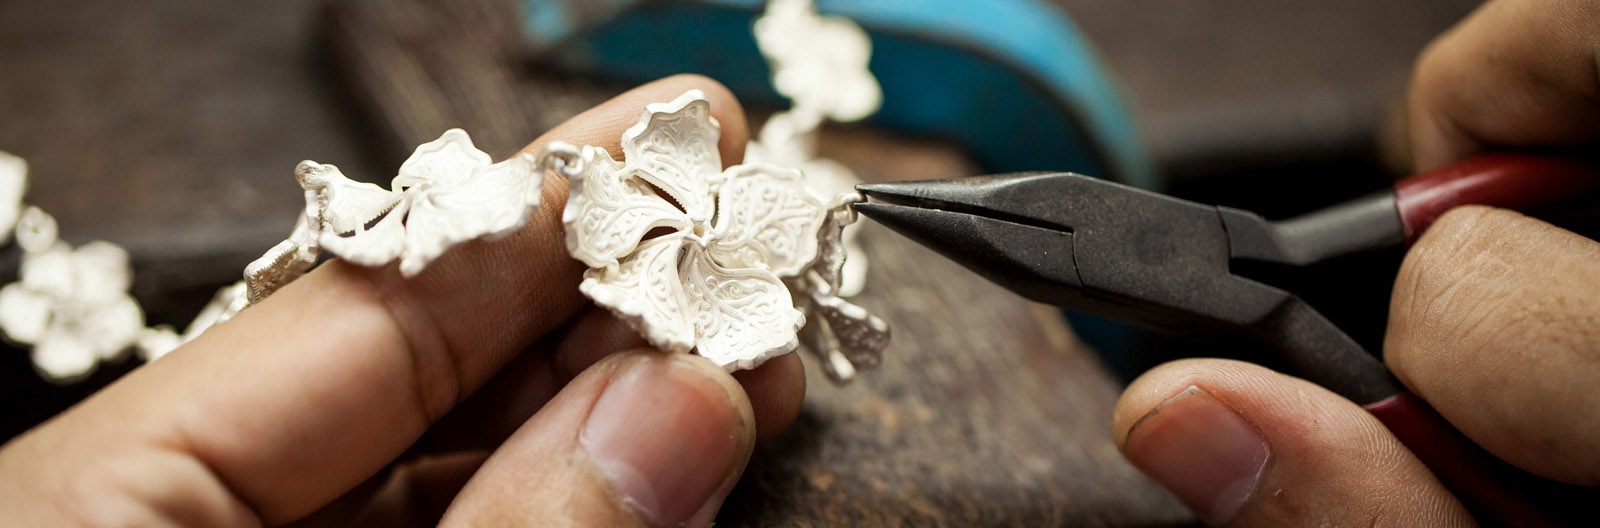
Now that all the jewelry pieces are cast and pre-polished, the next jewelry manufacturing process is “assembly”. Here is where earring posts are added to the earrings, bails to hold pendants are added, or bracelet links are attached. To do this, a special silver alloy that melts at a slightly lower temperature than our cast pieces of jewelry is used to solder or weld these silver pieces, called findings, into place. Once all the soldering is completed, the jewelry creation is ready to move to the pre-polish stage.
JEWELRY MANUFACTURING STEP 8 : PRE POLISH
With metal work completed, the next step in jewelry manufacturing is buffing and polishing. Jewelry polishing is a multistage process whereby metal is buffed with soft rotary tools made from bristles, felt, or muslin. Applied in descending stages, from coarse to fine, wheels are charged with various polishing compounds to achieve the desired luster. The experienced craftsmen in our polishing department employ special techniques that bring out the ultimate luster in every piece of jewelry we create.
Buffing and polishing are the two procedures used to produce the final high luster on jewelry. Although often used interchangeably these are two separate operations. Buffing is an abrasive process where a small amount of the surface is removed. Tripoli is the most commonly used compound for buffing. It will remove minor scratches left from sanding and smooth out all surfaces, however it will not bright polish. Jewellery pieces require buffing before the gemstone is set. This is because once the gemstones are set the area below the gems portion cannot be polished and may affect the shine of the gemstones.
The final high luster is achieved by polishing which will be done at the last stage of jewelry manufacturing. Polishing uses harder compounds such as rouge. Varieties of rouges are available for different uses and are distinguished by their color. With rouge, there is almost no cutting action; it burnishes the metal, moving the surface layer around to smooth the fine scratches left from buffing. The natural properties of oxidized silver are revealed and showcased during this process as these pieces are painstakingly polished by hand.
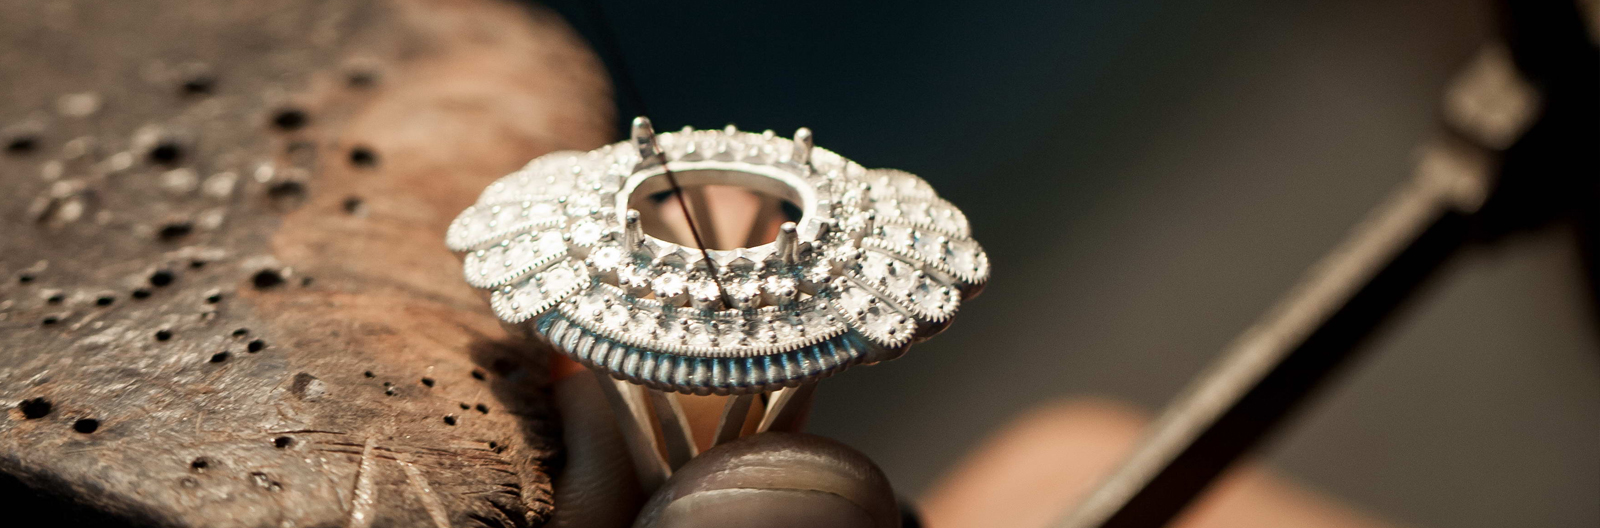
JEWELRY MANUFACTURING STEP 9 : SETTING STONE
A selection from our vibrant collection of gemstone jewelry can add a bit of geometrical shape and unique color to your wardrobe. Our designers have created a showroom full of variety gemstone styles, featuring translucent to opaque color of the rainbow. From fine red garnet, to swiss blue topaz and green peridot, the talented artisans have created an impressive variety of designer colored stone jewelry. Along with traditional gems, you will find exotic pieces holding rare, multi facets, one-of-a-kind gems, in shapes and colors that are not seen at traditional jewelry stores.
Stone setting is one of the essential stages of jewelry manufacturing, in which gemstones are attached in a metal casting. The pleasure and challenge of including gems in a jewelry object, apart from the intrinsic beauty of the gem, is to resolve the various factors that come into play. Well designed stone setting techniques must achieve several goals simultaneously – the setting must hold a gemstone securely, enhance the brilliance of a gemstone by showing its cut, clarity and color, stand up to wear while protecting the stone, as well as artfully compliment the design and structure of your setting.
The true goal is to present the gemstone in a way that most flatters it, without dramatizing the method in which it is secured. Jewelry designers use numerous methods to set a gemstone into a jewelry item, which generally is based on gemstone’s cut and proportion. Some of these methods and techniques are accepted and appreciated worldwide like prong setting, bezel setting, channel setting, pave setting, tension setting etc.
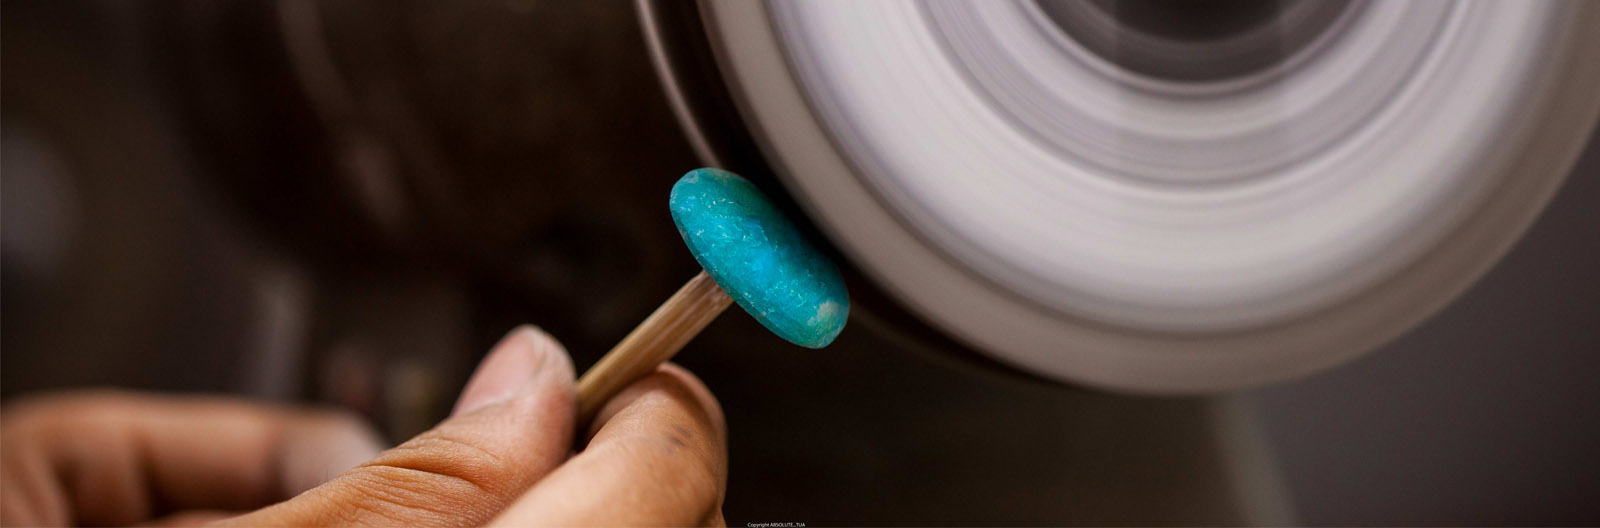
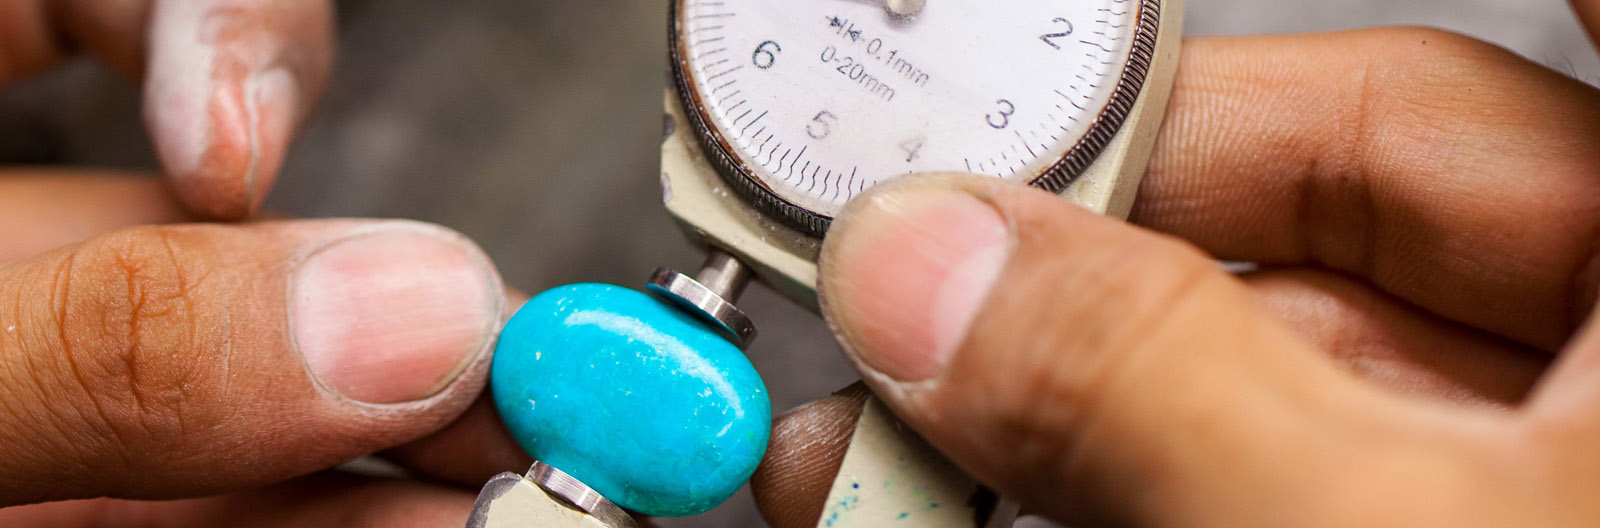
JEWELRY MANUFACTURING STEP 10 : STONE CUTTING

A selection from our vibrant collection of gemstone jewelry can add a bit of unusal shape and unique color to your wardrobe. Our designers have created a showroom full of variety gemstone styles, featuring translucent to opaque color of the rainbow. From fine red garnet, to swiss blue topaz and green peridot, the talented artisans have created an impressive variety of designer colored stone jewelry. Along with traditional gems, you will find exotic pieces holding rare, multi facets, one-of-a-kind gems, in shapes and colors that are not seen at traditional jewelry stores.
Many of our creative collections would require individual hand cut gemstones freeform inlay shape. Cutting a gemstone is a slow process of grinding down some of the world’s hardest substances into geometrically precise shape, faceting or other complicating shape. It takes dedication and skill to accurately execute each step in the process of cutting and polishing so that each stone is perfectly fit the setting. The process begins by using a diamond saw to trim the rough piece into a more manageable size and shape, or to remove damaged or inclusion pats of the stone.
The next step, preforming or grinding, involves the cutter using a machine embedded with diamond to give the stone the approximate shape to which it is best suited. A water supply of the machine provides a coolant/lubricant to wash away debris and keep the stone from overheating as it is ground on progressively finer wheels. Following the preforming, the cutter uses wheels with finer abrasives for the sanding stage. Its purpose is to remove deep scratches left by coarser abrasives during grinding. Since it removes material less rapidly, it also allows more delicate control over final shaping of the stone prior to polishing
Lastly, the cutter will use a special polishing lap which is even finer than the faceting lap. It is also primed with very fine diamond powder. Each facet is then polished individually to a high sheen, giving the stone a fine luster. Lastly the stone is uses very fine abrasives to create the surface lustre and complete the incredible transformation of our humble stone into a fine luster
There’s science behind the magic of cutting gems, in the form of cut angles, table percentages, gems’ hardness, cleavage, inclusion, polishing wheel, and sand paper grits, and a whole host of other figures and measurements. A good cutter will perform each step with intuition and skill leading to a symmetrical, scintillating, beautiful finished piece. It takes many years to attain a high level of competence in this art and highly skilled cutters to visualize how a piece of rough can be transformed into something of great beauty whilst balancing a host of considerations and challenges along the way.
After insertion, stones are ground down using water-cooled grinding wheels so they are flush with the surface of the casting and, last, polished using a fabric-covered rubber disc coated with various-grit diamond compounds. It is at this point, says Bagley, that the incomparable end result of inlay is realized: “the fluid flow of gem and silver to create a seamless blend of mineral and metal.”
JEWELRY MANUFACTURING STEP 11 : FINAL POLISHING
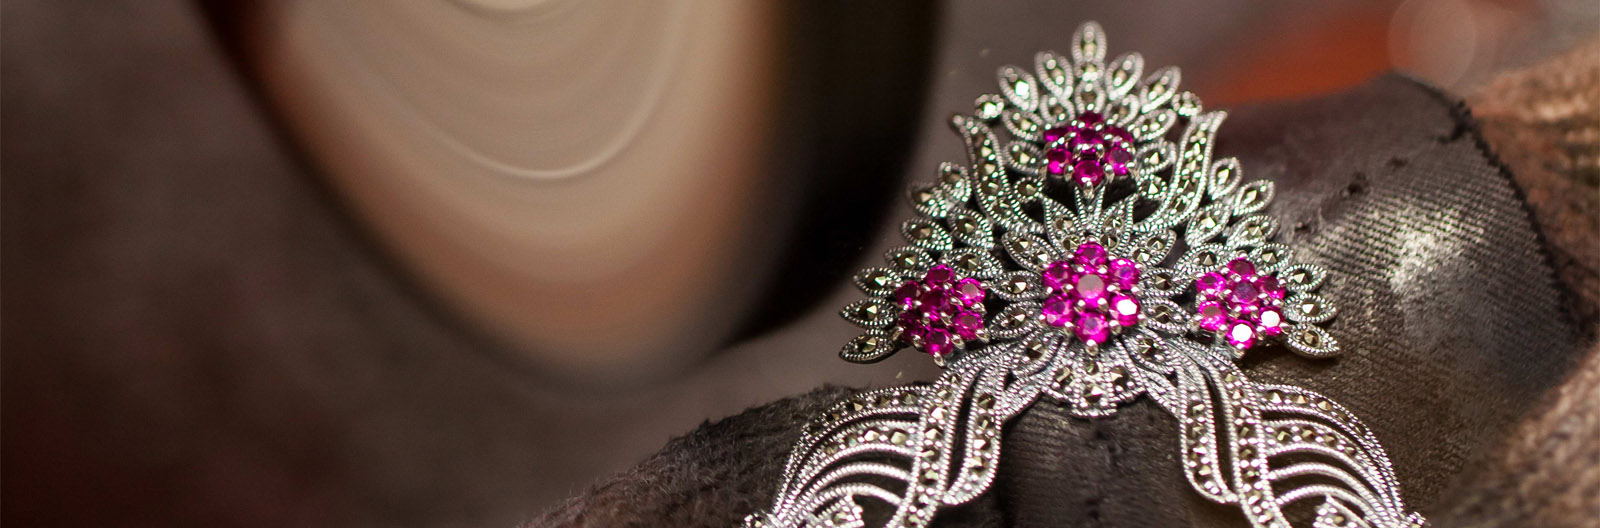
Now the piece of jewelry is finished and it only needs a light final polish to bring out the high luster and shine of the silver. Polishing uses harder compounds such as rouge to achieve the desired luster. Varieties of rouges are available for different uses and are distinguished by their color. For silver metal, wholesale jewelry, this is done by putting fine red jeweler’s rouge on a soft cotton cloth and buffing the piece by hand, making sure that all the details and highlights shine. With rouge, there is almost no cutting action; it burnishes the metal, moving the surface layer around to smooth the fine scratches left from buffing.
The experienced craftsmen in our polishing department employ special techniques that bring out the ultimate luster in every piece of jewelry we create. The natural properties of oxidized silver are revealed and showcased during this process as these pieces are painstakingly polished by hand. As a final jewelry manufacturing process, the jewelry pieces are now ready to be worn and appreciated by the wearer for its beauty and work
facebook fanpage Hong factory